
Yoga is a great form of exercise for people of all ages, but it can be particularly beneficial we get over. I’ve put together 11 Best Yoga Poses for Over 50 as a guide to help those in their golden years or younger stay flexible, strong, and balanced.
As we age, our muscles naturally become shorter and less elastic, which can lead to stiffness and reduced range of motion.
Yoga can help to improve flexibility and range of motion, and can also help to strengthen and tone the muscles. In addition, yoga can have a positive impact on mental well-being, helping to reduce stress and tension and improve the overall sense of calm.
Explore eleven of the best yoga poses for people over 50, highlighting the benefits of each pose and providing step-by-step instructions on how to do them safely and effectively.
11 Best Yoga Poses for Over 50
Mountain pose
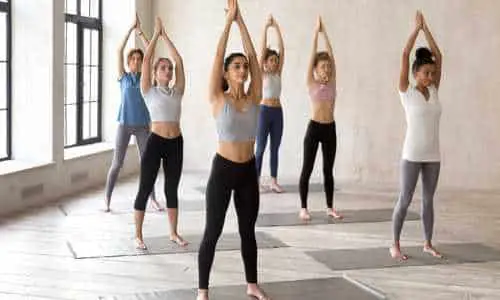
The Mountain pose, also known as the “Tadasana”, helps to improve posture and balance.
How to perform the Mountain pose
-
Stand with your feet hip-width apart, with your big toes touching and your heels slightly apart.
-
Engage your quadriceps muscles by lifting your kneecaps slightly.
-
Lift your chest and draw your shoulder blades down your back.
-
Lift your arms towards the ceiling, with your palms facing each other.
-
Gently lift your heels off the ground, balancing on the balls of your feet.
-
Hold the pose for 30 seconds to 1 minute, breathing deeply and focusing on your balance.
-
To release the pose, slowly lower your heels back down to the ground and bring your arms back down to your sides.
-
To release the pose, slowly lower your heels back down to the ground and bring your arms back down to your sides.
Remember to keep your abdominal muscles engaged and your pelvis tilted slightly forward as you hold the pose.
Mountain pose mistakes to avoid
Here are several common mistakes people often make when practicing Mountain Pose:
-
Poor alignment: It’s important to align your body correctly in Mountain Pose. Make sure your feet are rooted into the ground, your hips are stacked over your ankles, and your shoulders are relaxed.
-
Sinking into the hips: Some people tend to sink into their hips, which can cause their lower back to arch. Instead, try to lift the sitting bones up and engage your core muscles to maintain a neutral spine.
-
Holding the breath: It’s important to breathe evenly and deeply in Mountain Pose. Avoid holding your breath or taking shallow breaths.
-
Tight muscles: If you have tight muscles, it may be difficult to maintain proper alignment in Mountain Pose. It’s important to practice regular stretching to improve flexibility and make it easier to find proper alignment.
-
Rushing through the pose: Mountain Pose is more than just a standing pose. It’s an opportunity to find balance and stillness in the body and mind. Take your time to settle into the pose and find your balance before moving on to the next pose.
Cat-cow pose
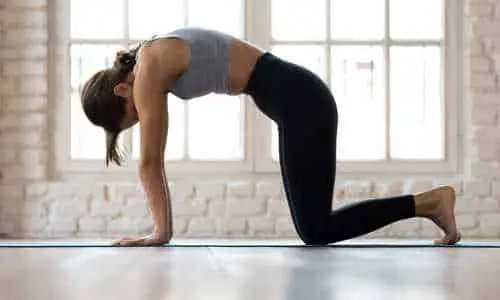
This cat-cow pose helps to stretch and strengthen the back muscles. It works to improve flexibility and range of motion in the spine.
How to perform the yoga cat-cow pose:
-
Start on your hands and knees, with your wrists under your shoulders and your knees under your hips.
-
As you exhale, round your spine towards the ceiling, tucking your chin towards your chest and bringing your navel towards your spine. This is the “cat” pose.
-
As you inhale, arch your back and lift your head and tailbone towards the ceiling. This is the “cow” pose.
-
Alternate between the cat and cow poses, moving slowly and smoothly with your breath.
-
Continue for several breaths, taking care to keep your movements fluid and controlled.
-
To come out of the pose, return to a neutral position on your hands and knees.
Cat-cow pose mistakes to avoid
Here are several common mistakes people often make when practicing Cat-cow Pose:
-
Not keeping the spine aligned and straight – It’s important to keep the spine in a neutral position, rather than rounding or arching too much.
-
Not moving through the entire range of motion – Be sure to fully extend and flex the spine during the cat and cow poses.
-
Failing to engage the core muscles – Engaging the core helps to support the spine and prevent over-arching or collapsing.
-
Not keeping the shoulders relaxed – The shoulders should be relaxed and down, rather than tensing or scrunching up towards the ears.
-
Not using the breath to help guide the movement – The breath should be used to facilitate the movement, rather than holding the breath or breathing erratically.
-
Losing balance – Be sure to maintain proper alignment and balance during the pose, particularly if you’re transitioning between the cat and cow poses.
-
Moving too quickly – It’s important to move slowly and mindfully through the pose, rather than rushing through it or moving too quickly.
Child’s pose
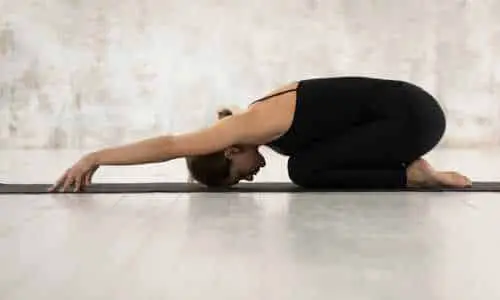
The Child’s pose stretches the back and hips and aids in reducing stress and tension.
How to perform the yoga child’s pose:
-
Start on your hands and knees, with your wrists under your shoulders and your knees under your hips.
-
Spread your fingers wide and press your palms firmly into the ground.
-
As you exhale, slowly lower your hips back towards your heels, reaching your arms out in front of you.
-
Rest your chest on your thighs and your forehead on the ground.
-
Hold the pose for a few deep breaths, feeling the stretch in your back and hips.
-
To come out of the pose, slowly push yourself back up to a kneeling position on your hands and knees.
Remember to stretch slowly and gently, and never force your body into a stretch.
Child’s pose mistakes to avoid
Here are several common mistakes people often make when practicing the Child’s pose:
-
Not keeping the hips back enough: It’s important to keep the hips back towards the heels and not allow them to come up too high or sink too far forward. This can cause strain on the lower back and knees.
-
Not stretching the arms enough: Make sure to fully extend the arms and reach towards the front of the mat. This helps to stretch the shoulders and upper back.
-
Not keeping the head and neck relaxed: It’s easy to tense up the neck and head while in the child’s pose, but it’s important to keep them relaxed and not put too much weight on the forehead.
-
Not keeping the feet together: Make sure to keep the feet together and not allow them to splay out to the sides. This helps to maintain proper alignment and balance.
-
Not breathing deeply: The child’s pose is a great pose for relaxation and stress relief, so make sure to take deep, calming breaths while in the pose.
Downward facing dog
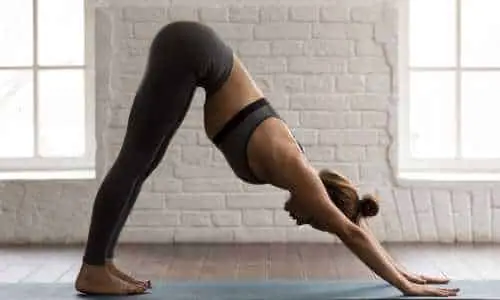
This Downward Facing Dog pose is excellent for stretching the hamstrings, calves, and back muscles. It is also used to improve flexibility and strengthen the upper body.
How to perform the Downward Facing Dog pose
-
Start on all fours with your wrists under your shoulders and your knees under your hips.
-
Lift your hips and straighten your legs, coming into an inverted “V” shape.
-
Walk your hands forward slightly to create a slight arch in your back.
-
Press firmly into your hands and spread your fingers wide.
-
Engage your core and lift your sit bones towards the ceiling.
-
Press your heels towards the floor, but do not worry if they do not touch the ground.
-
Keep your head between your upper arms, looking towards your navel or your feet.
-
Hold the pose for 5-10 breaths, then slowly lower back down to all fours.
Downward-facing dog mistakes to avoid
Here are several common mistakes people often make when practicing the downward-facing dog pose:
-
Not fully engaging the arms and legs: It’s important to press evenly into the hands and feet to create a strong foundation and fully engage the entire body.
-
Rounding the back is meant to create an inverted V shape with the body, so it’s important to keep the back straight and not allow it to round.
-
Allowing the heels to lift off the ground: It’s common for people to lift their heels off the ground, but it’s important to try to press them evenly into the ground for stability.
-
Not aligning the shoulders over the wrists: It’s important to align the shoulders over the wrists to prevent strain on the wrists and shoulders.
-
Not spreading the fingers evenly: It’s important to spread the fingers evenly to create a solid foundation and prevent strain on the wrists.
Warrior I pose
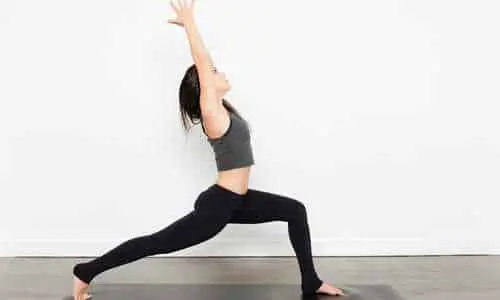
This Warrior I pose works to strengthen the legs and core while improving balance and stability.
How to perform the Warrior I pose
-
Stand at the top of your mat with your feet hip-width apart
-
Step your left foot back, planting your heel on the ground and angling your toes towards the front of your mat
-
Bend your right knee over your right ankle, aligning your knee with your ankle
-
Reach your arms up over your head, keeping your shoulders relaxed and your palms facing each other
-
Gaze up at your hands and hold the pose for 30 seconds to a minute, breathing deeply
-
Release the pose by lowering your arms and straightening your legs, then repeat on the other side
Remember to keep your core engaged and your chest lifted as you hold the pose.
Warrior I mistakes to avoid
Here are several common mistakes people often make when practicing the Warrior I pose:
-
Not properly aligning the body in poses: It’s important to pay attention to proper alignment in yoga poses to ensure that you are getting the maximum benefits and avoiding potential injury.
-
Holding your breath: It’s important to focus on your breath during yoga practice and make sure you are taking deep, full breaths. Holding your breath can lead to tension and discomfort.
-
Rushing through poses: Take your time in each pose, and focus on your breath and alignment. Don’t rush through your practice, as it can lead to careless mistakes and potential injury.
-
Skipping warm-up and cool-down stretches: It’s important to properly warm up and cool down before and after your practice to prevent injury and help your body transition smoothly into and out of the practice.
Warrior II pose
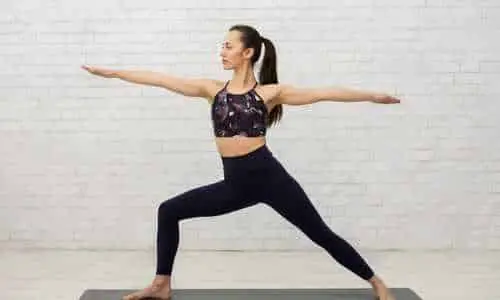
This Warrior II pose strengthens the legs and core and improves flexibility in the hips and shoulders.
How to perform the Warrior II pose
-
Stand with your feet about 3-4 feet apart, with your left foot pointing forward and your right foot turned out to the side.
-
Stand with your feet about 3-4 feet apart, with your left foot pointing forward and your right foot turned out to the side.
-
Bend your left knee to a 0-degree angle, keeping your right leg straight
-
Reach your arms out to the sides at shoulder height, with your palms facing down
-
Gaze over your left hand, keeping your neck and spine elongated
-
Hold the pose for 30 seconds to 1 minute, then slowly straighten your left leg and repeat on the other side
Remember to keep your core engaged and your shoulders relaxed as you hold the pose. If you have difficulty balancing, place your hands on your hips or use a wall for support. As you get more comfortable with the pose, try lifting your arms above your head and reaching for the sky.
Warrior II mistakes to avoid
Here are several common mistakes people often make when practicing the Warrior II pose:
-
Not sinking into the back heel: It is important to press firmly through the back heel in the Warrior II pose to create a strong foundation. If the back heel is lifted, it can cause the body to become unstable and make it difficult to maintain proper alignment.
-
Not aligning the front knee with the ankle: In the warrior II pose, the front knee should be aligned directly over the ankle to prevent strain on the knee joint. If the knee is misaligned, it can cause discomfort and even injury.
-
Not engaging the core: It is important to engage the core muscles in the Warrior II pose to maintain proper posture and alignment. Without core engagement, the pose may become sloppy and unstable.
-
Not opening the hips: In the Warrior II pose, it is important to open the hips and rotate the back foot outward to create a strong foundation. If the hips are not open, it can cause the pose to become unstable and make it difficult to maintain proper alignment.
-
Not extending the arms fully: In the Warrior II pose, it is important to extend the arms fully and engage the muscles in the shoulders and upper back. If the arms are not fully extended, it can cause the pose to become weak and unstable.
Triangle pose
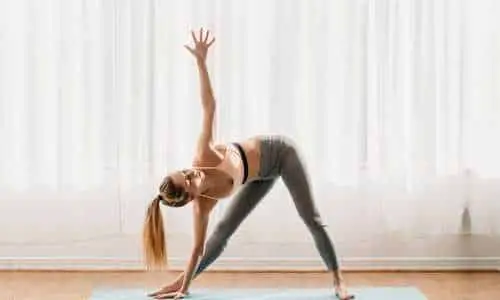
The Triangle pose strengthens the legs and core and works to improve flexibility in the hips and shoulders.
How to perform the Triangle pose
-
Stand with your feet about 3-4 feet apart, with arms at your side
-
Turn your right foot out 90 degrees and left foot in slightly
-
Bring your arms out to the sides, parallel to the floor
-
Inhale and lift your arms overhead, keeping them shoulder-distance apart
-
Exhale and reach your right hand down toward your right ankle, keeping your left arm pointing toward the ceiling
-
Gently turn your head to loop up at your left-hand
-
Hold the pose for about 5-10 breaths, then slowly return to the starting position
-
Repeat on the other side
Remember to keep your core engaged and your spine long as you perform the triangle pose. If you have any lower back pain, you can place a block under your hand for support.
Triangle pose mistakes to avoid
Here are several common mistakes people often make when practicing the Triangle pose:
-
Not engaging the core muscles: It is important to engage the core muscles in the triangle pose to maintain proper alignment and stability in the pose.
-
Not straightening the front leg: It is important to keep the front leg straight and strong in the triangle pose to provide a stable foundation for the pose. Bending the front leg can cause the pelvis to tilt and disrupt proper alignment.
-
Not reaching the hand towards the sky: Reaching the hand towards the sky helps to lengthen the spine and create proper alignment in the pose.
-
Not aligning the front foot and hand: It is important to align the front foot and hand in the triangle pose to create proper balance and alignment in the pose.
-
Not keeping the head in line with the spine: It is important to keep the head in line with the spine in the triangle pose to maintain proper alignment in the pose.
Tree pose
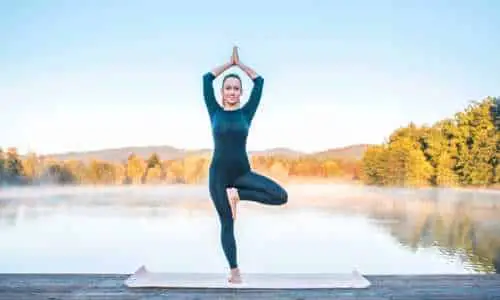
The Tree pose improves balance and stability while strengthening the legs and ankles.
How to perform the tree pose
-
Stand in the mountain pose with your feet together and your hands on your hips.
-
Shift your weight onto your left foot and bend your right knee, bringing the sole of your right foot to the inner thigh of your left leg.
-
Press your right foot into your left thigh and lift your arms above your head, bringing your palms together in a prayer position.
-
Engage your core and lift your chest, keeping your shoulders relaxed and your gaze fixed on a stationary point in front of you.
-
Hold the pose for 30 seconds to 1 minute, taking deep breaths.
-
To release the pose, lower your arms and gently unthread your right leg, returning to the mountain pose.
-
Repeat on the other side.
Remember to keep your core engaged and your gaze fixed on a stationary point to help maintain balance. If you feel unstable, you can place your hands on your hips or on a wall for support.
Tree pose mistakes to avoid
Here are several common mistakes people often make when practicing the Tree pose:
-
Not engaging the core muscles: It is important to engage the core muscles to maintain balance and stability in the pose.
-
Not rooting down through the standing leg: It is important to evenly distribute your weight through the standing leg to maintain balance in the pose.
-
Not aligning the lifted foot with the hip: It is important to align the lifted foot with the hip to avoid straining the knee or hip joint.
-
Not lifting the arms overhead: Lifting the arms overhead helps to open up the chest and improve balance in the pose.
-
Not maintaining a neutral spine: It is important to maintain a neutral spine to avoid straining the back muscles.
-
Not focusing on the breath: Focusing on the breath can help to calm the mind and improve balance in the pose.
-
Not practicing proper alignment: It is important to practice proper alignment to avoid injury and get the most benefits from the pose.
Bridge pose
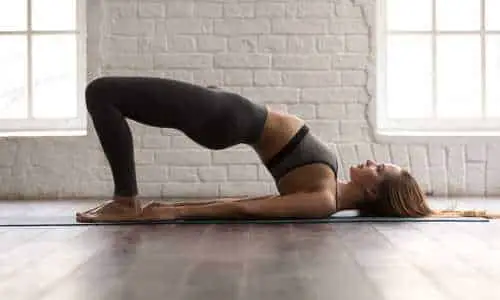
The Bridge pose is a great yoga pose for strengthening the back and core and improving flexibility in the spine.
How to perform the Bridge pose
-
Lie on your back with your knees bent and your feet flat on the floor, about hip-width apart.
-
Place your arms at your sides, with your palms facing down.
-
Exhale and lift your hips off the floor, pressing into your feet and hands.
-
Lift your chest towards the ceiling, keeping your shoulders relaxed and your head on the floor.
-
Hold the pose for about 30 seconds, then slowly lower your hips back to the floor.
Remember to keep your breath steady and smooth as you hold the pose. If you feel any discomfort or strain in your back, lower your hips back to the floor and try a modified version of the pose, such as lifting one leg off the floor at a time.
Bridge pose mistakes to avoid
Here are several common mistakes people often make when practicing the Bridge pose:
-
Not keeping the back straight: It is important to keep the spine in a neutral position and not arch or round the back.
-
Not engaging the core: Engaging the core helps to stabilize the pose and protect the lower back.
-
Not squeezing the shoulder blades together: Squeezing the shoulder blades together helps to open the chest and improve posture.
-
Not keeping the feet, and hip distance apart: Keeping the feet too close together can cause strain on the knees and hips.
-
Not lifting the hips high enough: It is important to lift the hips high enough so that the body forms a straight line from the shoulders to the knees.
-
Not keeping the head in line with the spine: It is important to keep the head in line with the spine to avoid straining the neck.
Corpse pose
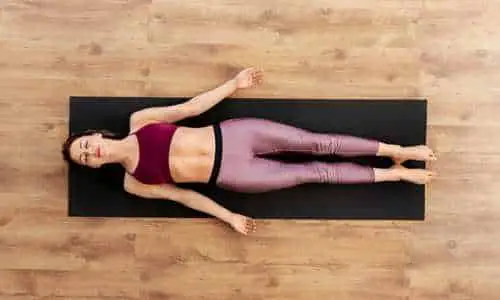
The Corpse pose relaxes and stretches the entire body. It can also help to reduce stress and tension.
How to perform the Corpse pose
-
Find a comfortable place to lie down, such as on a yoga mat or a soft surface.
-
Lie on your back with your feet hip-width apart and your arms by your sides, palms facing up.
-
Close your eyes and take a few deep breaths, focusing on the sensation of the breath moving in and out of your body.
-
Relax your entire body, letting go of any tension or stress.
-
Stay in the pose for as long as you like, continuing to focus on your breath.
-
When you are ready to come out of the pose, slowly wiggle your fingers and toes, and then gently roll to one side. Take a moment to rest in this position before slowly getting up.
It is important to remember to stay present and focused, letting go of any thoughts or distractions.
Corpse pose mistakes to avoid
Here are some corpse pose mistakes that occur often:
-
Not aligning the body correctly: It is important to make sure the body is aligned properly to fully relax and reap the benefits.
-
Not relaxing the body fully: It can be difficult to fully relax, but it is important to try and let go of any tension in the body.
-
Holding the pose for too long: While this is a restorative pose, it is important not to hold it for too long. This can lead to discomfort and potential strain on the body. It is best to hold the pose for 5-10 minutes at a time.
-
Not using props: Using props such as blankets, blocks, or bolsters can help support the body and promote relaxation in the corpse pose.
-
Not focusing on the breath: It is essential to focus on the breath to fully relax and release tension in the body. Make sure to take deep, slow breaths and let go of any distractions or thoughts.
Seated forward pose
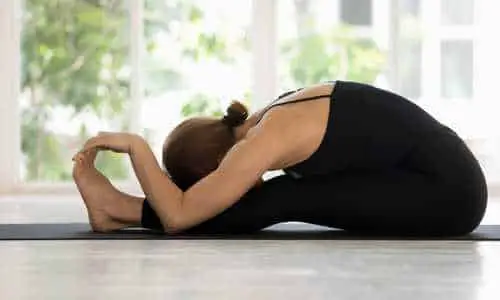
Th seated forward pose stretches the back and legs, while improving flexibility in the spine and hips.
How to perform the seated forward bend pose
-
Sit on the floor with your legs extended in front of you and your feet flexed.
-
Sit up tall with a long spine, and place your hands on your knees.
-
Inhale, and as you exhale, slowly hinge at the hips and lower your chest towards your thighs.
-
Reach for your toes with your hands, or use a strap or towel to help you reach if you are not able to touch your toes.
-
Hold the stretch for about 30 seconds to 1 minute, breathing deeply.
-
To come out of the pose, slowly lift your chest and bring your hands back to your knees.
Remember to stretch slowly and gently, and never force your body into a stretch.
Seated forward pose mistakes to avoid
Here are several common mistakes people often make when practicing the seated forward pose:
-
Not keeping the back straight: It is important to maintain a straight spine in the seated forward pose to avoid strain on the lower back.
-
Hunching over: Avoid hunching over or rounding the shoulders as this can lead to poor posture and discomfort.
-
Leaning too far forward: Be mindful of leaning too far forward as this can cause strain on the lower back and hips.
-
Not using props: If you are struggling to reach your feet or maintain balance in the pose, it is okay to use props such as blocks or blankets to support your body.
-
Locking the knees: Avoid locking the knees as this can cause strain on the joints. Keep a slight bend in the knees to maintain balance and stability.
-
Not engaging the core: It is important to engage the core muscles to maintain balance and stability in the pose.
FAQs
What is yoga and how does it help your body?
Yoga is a practice that combines physical poses, breathing exercises, and meditation.
It helps improve flexibility, strength, and balance.
It can also reduce stress and improve heart health.
Can yoga help you lose weight?
Yes, yoga can help with weight loss.
It increases your awareness of your body, which can lead to healthier eating habits.
Some styles of yoga, like power yoga, are also good physical workouts that burn calories.
How does yoga reduce stress?
Yoga reduces stress by promoting relaxation and lowering the levels of stress hormones in the body.
Breathing exercises and meditation also help calm the mind.
Can practicing yoga improve your posture?
Yes, yoga can improve your posture.
It strengthens and aligns your body, which helps you stand and sit straighter.
Does yoga have benefits for mental health?
Yoga has many benefits for mental health.
It can reduce symptoms of anxiety and depression.
It also improves concentration and promotes a positive mood.
How does yoga benefit your heart?
Yoga benefits the heart by reducing blood pressure, lowering cholesterol levels, and improving circulation.
These effects can reduce the risk of heart disease.
Can yoga help with pain relief?
Yes, yoga can help relieve pain.
It is particularly effective for lower back pain, arthritis, and headaches.
Yoga stretches and strengthens the body, which can reduce chronic pain.

Claudia Faucher is a fitness and lifestyle blogger who shares practical tips for women over 50 on staying active, stylish, and confident. As the creator of FitFab50.com and Beyond59.com, she covers topics like workout gear, beauty trends, and wellness routines. Claudia is passionate about helping others live their best life at any age.